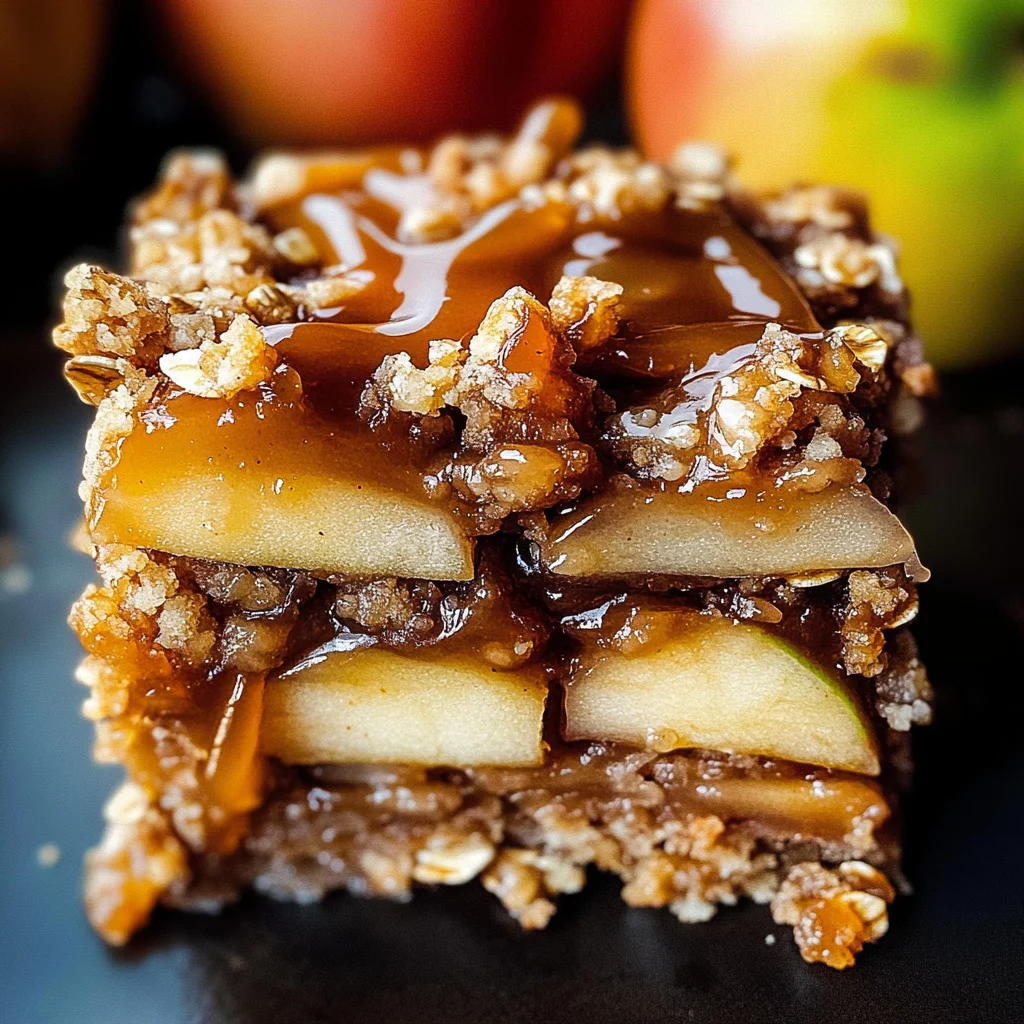
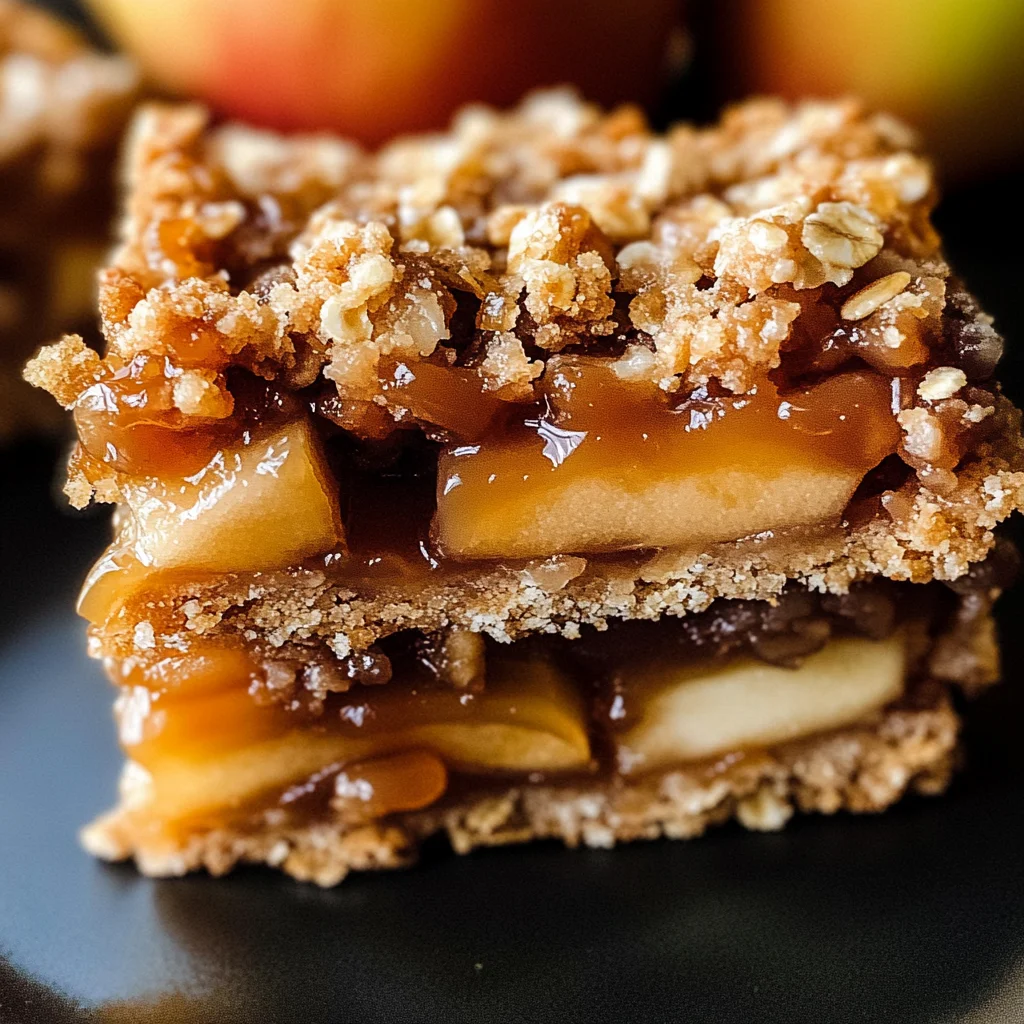
Salted Caramel Apple Pie Bars
If you’re looking for a cozy dessert that encapsulates the essence of fall, then these Salted Caramel Apple Pie Bars are just what you need! Imagine biting into a soft, buttery bar filled with tender spiced apples and topped with a drizzle of rich salted caramel. It’s like apple pie, but way easier to make and share with loved ones. Whether you’re hosting a family gathering or simply want to treat yourself after a long day, these bars are perfect for any occasion.
Not only do they taste amazing, but they also fill your home with the warm aroma of cinnamon and baked apples. I always find myself making these during the cooler months, and they never fail to bring smiles all around. Plus, they’re super easy to whip up!
Why You’ll Love This Recipe
- Easy to prepare: No fussing with pie crusts! The crumble doubles as both the crust and topping.
- Family-friendly: Kids love these sweet bars just as much as adults do!
- Perfect for leftovers: They store well in the fridge and taste great warm or cold.
- Make-ahead convenience: You can prepare the caramel in advance for stress-free serving.
- Endless flavor: The combination of spices brings out the natural sweetness of the apples beautifully.
Ingredients You’ll Need
These Salted Caramel Apple Pie Bars are made with simple, wholesome ingredients you likely have on hand. Let’s gather everything we need to create this delightful dessert!
For the Apple Filling
- 5 medium apples, sliced between 1/8 and 1/4 thick (744 grams sliced)
- 1 tbsp lemon juice
- 3 tbsp all-purpose flour (21 grams)
- 1/3 cup light brown sugar, packed (73 grams)
- 1 tbsp cinnamon (7 grams)
- 3/8 tsp nutmeg
- 1/4 tsp allspice
- 1/4 tsp ground cloves
- pinch of salt
For the Crust/Topping
- 1 and 1/2 cups salted butter, melted (340 grams, or 24 tbsp)
- 3 cups all-purpose flour, spooned & leveled or weighed out (390 grams)
- 2 cups old-fashioned whole rolled oats (195 grams)
- 1 and 1/2 cups light brown sugar, packed (330 grams)
- 1 and 1/2 tsp baking soda
- 1 tsp cinnamon
- 1/2 tsp salt
For the Salted Caramel Sauce
- 1 cup granulated sugar (210 grams)
- 6 tbsp salted butter, cubed (85 grams)
- 1/2 cup + 1 tbsp heavy cream (135 grams)
- pinch of fine sea salt
Variations
This recipe is wonderfully flexible, allowing you to put your own spin on it. Here are some fun ideas to customize your bars!
- Add nuts: Fold in chopped walnuts or pecans for an added crunch in the filling.
- Switch up the fruit: Use pears instead of apples for a unique twist.
- Add a cream cheese layer: Spread a layer of sweetened cream cheese under the apple filling for extra richness.
- Try different spices: Experiment with pumpkin spice or cardamom for a different flavor profile.
How to Make Salted Caramel Apple Pie Bars
Step 1: Prep Your Oven and Pan
Preheat your oven to 350℉. This step is key because it ensures even baking. While it heats up, spray a 9×13 pan with nonstick spray and line it with parchment paper. This will make it easier to lift out your delicious bars later!
Step 2: Prepare the Apple Filling
In a medium bowl, toss together your sliced apples with lemon juice and all those warm spices. Using a silicone spatula, mix gently so you don’t break up those lovely apple slices. Letting them sit allows those flavors to meld together beautifully while we work on the crust.
Step 3: Make the Crust/Topping
Melt your butter in a large bowl (this makes it easy to mix). Then stir in all remaining ingredients for your crust until everything is combined. This mixture gives you that delightful crumbly texture we love!
Step 4: Assemble Your Bars
Reserve about 2 cups of this mixture for topping later. Press the rest firmly into your prepared pan—this will be our base! Next, give those spiced apples another stir before spooning them over your base evenly, leaving any excess liquid behind. Finally, sprinkle that reserved crust mixture over the top.
Step 5: Bake Away!
Pop your pan in the oven and bake for about 38 to 45 minutes. The top should turn golden brown while those apples become tender and flavorful. While they bake, let’s make our irresistible salted caramel sauce next!
Step 6: Make Your Salted Caramel Sauce
Follow my detailed recipe linked here for making salted caramel sauce! It’s easier than you think—just keep an eye on it as it cooks to get that perfect golden color.
Step 7: Serve & Store
Let those delicious bars cool on a wire rack for about one to two hours before slicing them into squares. Drizzle with that luscious salted caramel right before serving! Store any leftovers in an airtight container in the fridge.
Step 8: Make-Ahead Tips
Want to save time? You can prepare your caramel sauce up to three days ahead! Just microwave it briefly when you’re ready to use it. These bars can also be made one day ahead—just refrigerate them after they’ve cooled down at room temperature.
Enjoy every bite of these Salted Caramel Apple Pie Bars; they’re sure to become a favorite in your home just like they are in mine!
Pro Tips for Making Salted Caramel Apple Pie Bars
Making these Salted Caramel Apple Pie Bars can be a delightful experience, and with a few pro tips, you can ensure they turn out perfectly every time!
-
Choose the Right Apples: Opt for a mix of sweet and tart apples like Granny Smith and Honeycrisp. This combination brings depth to the flavor, balancing sweetness with a hint of tartness.
-
Don’t Skimp on Cooling: Allow the bars to cool completely before slicing. This helps them set up nicely, making them easier to cut into neat squares without falling apart.
-
Use Fresh Spices: Freshly ground spices can make a significant difference in flavor. If possible, grind your nutmeg, allspice, and cloves just before using them to enhance their aromatic qualities.
-
Reserve Some Caramel for Serving: Make extra salted caramel sauce to drizzle over each slice when serving. This not only looks beautiful but also adds an extra layer of flavor that enhances the enjoyment of each bite.
-
Try Different Toppings: Experiment with different toppings like chopped nuts or whipped coconut cream to add texture and flavor contrast to your bars.
How to Serve Salted Caramel Apple Pie Bars
These Salted Caramel Apple Pie Bars are not just delicious; they can also be presented beautifully for any occasion! Here are some ideas for serving them up right.
Garnishes
- Chopped Pecans or Walnuts: A sprinkle of toasted nuts adds crunch and a nutty flavor that complements the warm spices in the bars.
- Fresh Whipped Cream: A dollop of homemade whipped cream offers a light, creamy contrast to the sweet and spiced bars.
- Cinnamon Dusting: A light dusting of cinnamon on top provides an aromatic touch that enhances their fall-inspired taste.
Side Dishes
- Vanilla Ice Cream: The classic pairing with warm apple desserts, vanilla ice cream melts slightly over the warm bars for a delightful combination.
- Greek Yogurt with Honey: A scoop of tangy Greek yogurt drizzled with honey adds creaminess and balances the sweetness of the bars.
- Pumpkin Spice Latte: For a cozy beverage option, serve these bars alongside a warming pumpkin spice latte that echoes their fall flavors.
- Spiced Tea: A cup of chai or spiced tea complements the warming spices in the bars, creating a comforting experience perfect for autumn afternoons.
With these tips and serving suggestions, your Salted Caramel Apple Pie Bars will not only taste fantastic but also look inviting on any dessert table! Enjoy every bite!
Make Ahead and Storage
These Salted Caramel Apple Pie Bars are perfect for meal prep! You can make them in advance, and they store beautifully, making them a great treat to enjoy throughout the week.
Storing Leftovers
- Store bars in an airtight container in the fridge for up to 3-4 days.
- If you’ve added salted caramel on top, refrigerate them anyway to keep them fresh.
- Keep any leftover caramel sauce in a separate airtight container or jar in the fridge.
Freezing
- To freeze, slice the bars and wrap each piece individually in plastic wrap.
- Place wrapped bars in a freezer-safe bag or container, removing as much air as possible.
- They can be frozen for up to 2 months. Just thaw in the fridge before serving.
Reheating
- For warm bars, microwave individual slices for 20-30 seconds until warmed through.
- You can also reheat the entire batch in a preheated oven at 350℉ for about 10-15 minutes.
FAQs
Here are some common questions about making Salted Caramel Apple Pie Bars:
Can I use different types of apples for Salted Caramel Apple Pie Bars?
Absolutely! Feel free to mix different apple varieties like Granny Smith, Honeycrisp, or Fuji for a more complex flavor.
How do I know when my Salted Caramel Apple Pie Bars are done baking?
The bars are ready when the topping is golden brown and the apples feel tender when pierced with a fork.
Can I make Salted Caramel Apple Pie Bars gluten-free?
Yes! Use gluten-free flour blends and ensure your oats are certified gluten-free.
How do I make the salted caramel sauce?
You can follow my detailed salted caramel recipe linked above! It’s simple and adds that perfect finishing touch.
Final Thoughts
I hope you find joy in making these Salted Caramel Apple Pie Bars! They’re not only delicious but also bring that cozy fall vibe right into your kitchen. Enjoy every sweet bite, and don’t hesitate to share this recipe with friends and family—after all, good food is meant to be shared!
Salted Caramel Apple Pie Bars

Indulge in the delightful flavors of fall with these Salted Caramel Apple Pie Bars. These scrumptious dessert bars combine tender, spiced apples with a buttery oat crust and a rich salted caramel drizzle. Perfect for sharing at family gatherings or enjoying as a weekend treat, these bars offer all the classic comfort of apple pie without the fuss of traditional baking. With each bite, you’ll savor the warm spices and sweet caramel, making them an instant favorite for both kids and adults alike. Easy to prepare and even easier to enjoy, these bars are sure to become a staple recipe in your home!
- Prep Time: 20 minutes
- Cook Time: 45 minutes
- Total Time: 1 hour 5 minutes
- Yield: Approximately 12 servings 1x
- Category: Dessert
- Method: Baking
- Cuisine: American
Ingredients
- 5 medium apples (about 744g sliced)
- 1 tbsp lemon juice
- 3 tbsp all-purpose flour
- 1/3 cup light brown sugar, packed (73 grams)
- 1 tbsp cinnamon (7 grams)
- 3/8 tsp nutmeg
- 1/4 tsp allspice
- 1/4 tsp ground cloves
- pinch of salt
- 1 and 1/2 cups salted butter, melted (340 grams, or 24 tbsp)
- 3 cups all-purpose flour
- 2 cups old-fashioned whole rolled oats (195 grams)
- 1 and 1/2 cups light brown sugar, packed (330 grams)
- 1 and 1/2 tsp baking soda
- 1 tsp cinnamon
- 1/2 tsp salt
- 1 cup granulated sugar (210 grams)
- 6 tbsp salted butter, cubed (85 grams)
- 1/2 cup + 1 tbsp heavy cream (135 grams)
- pinch of fine sea salt
Instructions
- Preheat oven to 350°F and prepare a 9×13 pan with nonstick spray and parchment paper.
- In a bowl, toss sliced apples with lemon juice, flour, brown sugar, cinnamon, nutmeg, allspice, cloves, and salt. Set aside.
- In another bowl, melt butter and combine with flour, oats, brown sugar, baking soda, cinnamon, and salt for the crust/topping.
- Press about two-thirds of the mixture into the prepared pan as the base.
- Spread apple filling evenly over the crust and sprinkle remaining mixture on top.
- Bake for 38–45 minutes until golden brown.
- Prepare salted caramel sauce while bars bake; drizzle over cooled bars before serving.
Nutrition
- Serving Size: 1 bar (approximately 85g)
- Calories: 320
- Sugar: 22g
- Sodium: 110mg
- Fat: 14g
- Saturated Fat: 8g
- Unsaturated Fat: 4g
- Trans Fat: 0g
- Carbohydrates: 46g
- Fiber: 3g
- Protein: 3g
- Cholesterol: 35mg