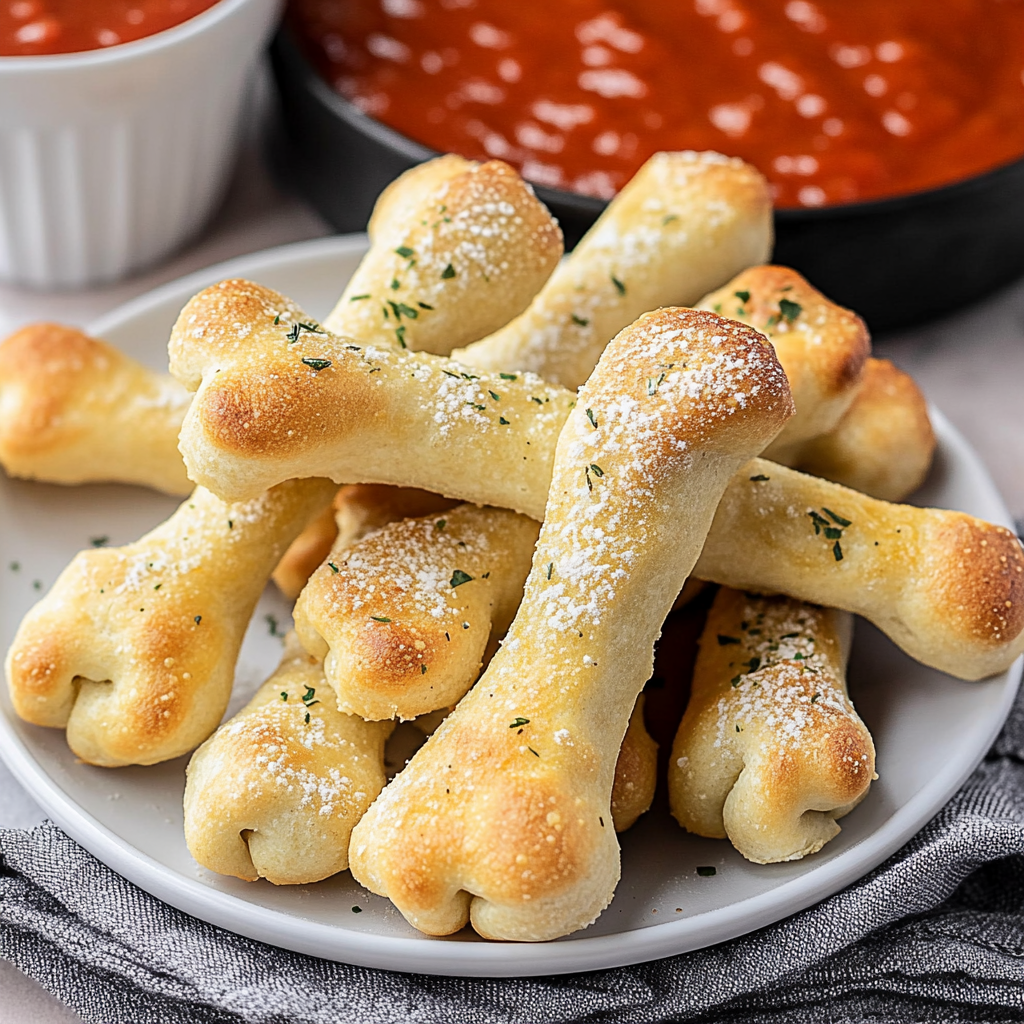
Irresistible Breadstick Bones Recipe for Fun Meals
There’s something wonderfully whimsical about serving up a batch of Breadstick Bones Recipe, especially when you’re looking to add a touch of fun to your mealtimes. These soft and cheesy breadsticks shaped like bones are not only delicious but also perfect for a variety of occasions—from Halloween gatherings to family movie nights. The moment you pull them out of the oven, golden brown and fragrant, you’ll understand why this recipe has become a favorite in my household.
Whether you’re looking to impress guests at your next party or simply want to indulge in a cozy snack at home, these breadstick bones are sure to be a hit. Pair them with marinara sauce for dipping, and you’ve got yourself a delightful treat that brings smiles all around!
Why You’ll Love This Recipe
– Fun shapes: The bone shape adds an element of playfulness that makes these breadsticks perfect for themed parties.
– Easy to make: With just a few simple ingredients, you can whip up these tasty treats in no time.
– Versatile serving: Great as an appetizer, snack, or side dish; they complement a variety of meals.
– Kid-friendly: Kids love the fun shape and cheesy flavor—it’s an easy way to get them involved in cooking!
– Perfect for sharing: With 16 servings, there’s plenty to go around for family and friends.
Ingredients You’ll Need
Before diving into the baking process, let’s gather our ingredients! This recipe is straightforward and uses common pantry staples that you might already have on hand.
For the Dough
– 1 cup + 2 tablespoons warm water
– 1 ¼ teaspoons active dry yeast
– 2 tablespoons sugar
– 1 ½ teaspoons salt
– 3 tablespoons canola oil
– 3-3¼ cups flour
For Topping
– 2 tablespoons butter melted
– ½ teaspoon garlic salt
– 1 tablespoon grated parmesan cheese
For Serving
– marinara sauce
Variations
This Breadstick Bones Recipe is versatile, allowing you to get creative based on your preferences! Here are some fun ideas to mix things up:
– Add herbs: Incorporate dried herbs like oregano or basil into the dough for added flavor.
– Cheese twist: Mix shredded mozzarella into the dough for extra cheesiness throughout.
– Spice it up: Sprinkle crushed red pepper flakes on top before baking for a spicy kick.
– Shape differently: Instead of bones, roll the dough into other fun shapes like ghosts or pumpkins for different occasions.
How to Make Breadstick Bones Recipe
Step 1: Prepare the Dough
In a large bowl or the bowl of a stand mixer, dissolve the yeast and sugar in the warm water. Let it sit until foamy and bubbly—this indicates that your yeast is active and ready to help your bread rise beautifully.
Step 2: Combine Ingredients
Add the salt, oil, and two cups of flour into the yeast mixture. Mix until combined. Gradually add the remaining flour, about a quarter cup at a time, until you achieve a soft dough that pulls away from the sides of the bowl. Kneading this dough until smooth is essential; it develops gluten which gives your breadsticks their lovely texture.
Step 3: Let It Rise
Place your kneaded dough in a greased bowl, cover it with a clean towel, and let it rise in a warm place for one hour. This step allows the dough to double in size as it ferments, creating air pockets that make your breadsticks light and fluffy.
Step 4: Shape Your Bones
After rising, gently punch down the dough and divide it into 16 equal pieces. Roll each piece into a long rope about 12 inches long. To create bone shapes, cut slits on either side of each rope and twist those ends outward—this step is crucial for achieving that playful appearance!
Step 5: Second Rise
Place your shaped breadsticks on a greased or parchment-lined baking sheet. Cover them again and let them rise for another 45 minutes to an hour until they’ve doubled in size once more. This second rise helps ensure that they will be soft and fluffy when baked.
Step 6: Bake Your Breadsticks
During the last ten minutes of rising time, preheat your oven to 425℉. Bake those delightful bone-shaped beauties for about 12–14 minutes until they’re golden brown—a lovely sight!
Step 7: Finish with Flavor
Once baked, remove them from the oven and brush with melted butter immediately. Sprinkle garlic salt and grated parmesan over top while they’re still hot—this final touch adds irresistible flavor!
Serve these scrumptious Breadstick Bones warm alongside marinara sauce for dipping! Enjoy every bite!
Pro Tips for Making Breadstick Bones Recipe
Making these Breadstick Bones is a delightful experience, and with a few tips, you can ensure they turn out perfectly every time. Here are some helpful hints to guide you through the process:
– Use warm water: The water should be warm but not hot. If it’s too hot, it can kill the yeast, and if it’s too cold, the yeast won’t activate properly.
– Knead well: Kneading the dough is essential for developing gluten. This gives the breadsticks that lovely soft texture we all crave. Aim for about 5-7 minutes of kneading until smooth.
– Don’t rush the rising: Allow the dough to rise in a warm place until it has doubled in size. This step is crucial for achieving fluffy breadsticks.
– Keep them covered: When letting the dough rise, cover it with a clean kitchen towel or plastic wrap to prevent it from drying out.
– Experiment with shapes: Get creative with your bone shapes! While this recipe outlines a classic bone design, feel free to let your imagination run wild.
How to Serve Breadstick Bones Recipe
These spooky breadstick bones make for an eye-catching appetizer at any gathering. Pair them with marinara sauce for dipping and watch them disappear!
Garnishes
– Fresh herbs: A sprinkle of fresh parsley or basil adds a pop of color and flavor.
– Red pepper flakes: For those who enjoy a little heat, a dash of red pepper flakes can spice things up.
Side Dishes
– Salad: A light green salad pairs beautifully and balances the savory flavors of the breadsticks.
– Vegetable platter: Offer an assortment of crunchy veggies alongside hummus or ranch dip for a healthy addition.
– Cheese platter: Complement your breadsticks with various cheeses for an indulgent touch.

Make Ahead and Storage
Preparing ahead of time can make entertaining easier and more enjoyable. Here’s how you can store your delicious breadstick bones:
Storing Leftovers
– Cool completely: Allow any leftover breadsticks to cool completely before storing them to avoid sogginess.
– Airtight container: Place them in an airtight container at room temperature for up to 2 days.
Freezing
– Freeze before baking: You can freeze the shaped but unbaked breadstick bones on a baking sheet. Once frozen solid, transfer them to a freezer bag for up to 3 months.
– Bake from frozen: When ready to enjoy, bake them straight from the freezer; just add a few extra minutes to the baking time.
Reheating
– Oven method: Reheat leftover breadsticks in a preheated oven at 350°F for about 5 minutes until warmed through.
– Microwave method: If you’re short on time, use the microwave on low power in 10-second intervals until heated, but be aware this may affect their crispness.
FAQs
If you have questions about making these delightful breadstick bones, you’re not alone! Here are some common inquiries:
Can I use whole wheat flour instead of all-purpose flour?
Yes, you can substitute whole wheat flour for part or all of the all-purpose flour. However, this may result in denser breadsticks, so consider starting with half whole wheat and half white flour.
Can I add cheese or herbs directly into the dough?
Absolutely! Feel free to mix in shredded cheese or dried herbs during the initial mixing stage for added flavor throughout your breadsticks.
What if my dough doesn’t rise?
If your dough doesn’t rise, it may be due to inactive yeast or insufficient warmth. Make sure your yeast is fresh and consider placing your dough in a warmer spot like near an oven or in a turned-off oven with just the light on.
Final Thoughts
I hope you enjoy making these Breadstick Bones as much as I do! They’re perfect for gatherings and will surely impress your friends and family. Don’t hesitate to share your creations or let me know how they turned out. Happy baking!
Breadstick Bones Recipe
Ingredients
Method
- In a large bowl or the bowl of a stand mixer, dissolve the yeast and sugar in the warm water. Let it sit until foamy and bubbly.
- Add the salt, oil, and two cups of flour into the yeast mixture. Mix until combined. Gradually add the remaining flour until you achieve a soft dough.
- Place your kneaded dough in a greased bowl, cover it with a clean towel, and let it rise in a warm place for one hour.
- After rising, gently punch down the dough and divide it into 16 equal pieces. Roll each piece into a long rope about 12 inches long and shape into bones.
- Place your shaped breadsticks on a greased or parchment-lined baking sheet. Cover them again and let them rise for another 45 minutes to an hour.
- Preheat your oven to 425℉. Bake the breadsticks for about 12–14 minutes until golden brown.
- Once baked, remove them from the oven and brush with melted butter immediately. Sprinkle garlic salt and grated parmesan over top.